Self-Leveling Mortars vs. Dry Leveling: Choosing the Right Method for Florida Interiors
⤵️ Listen to the podcast on self-leveling vs. dry leveling methods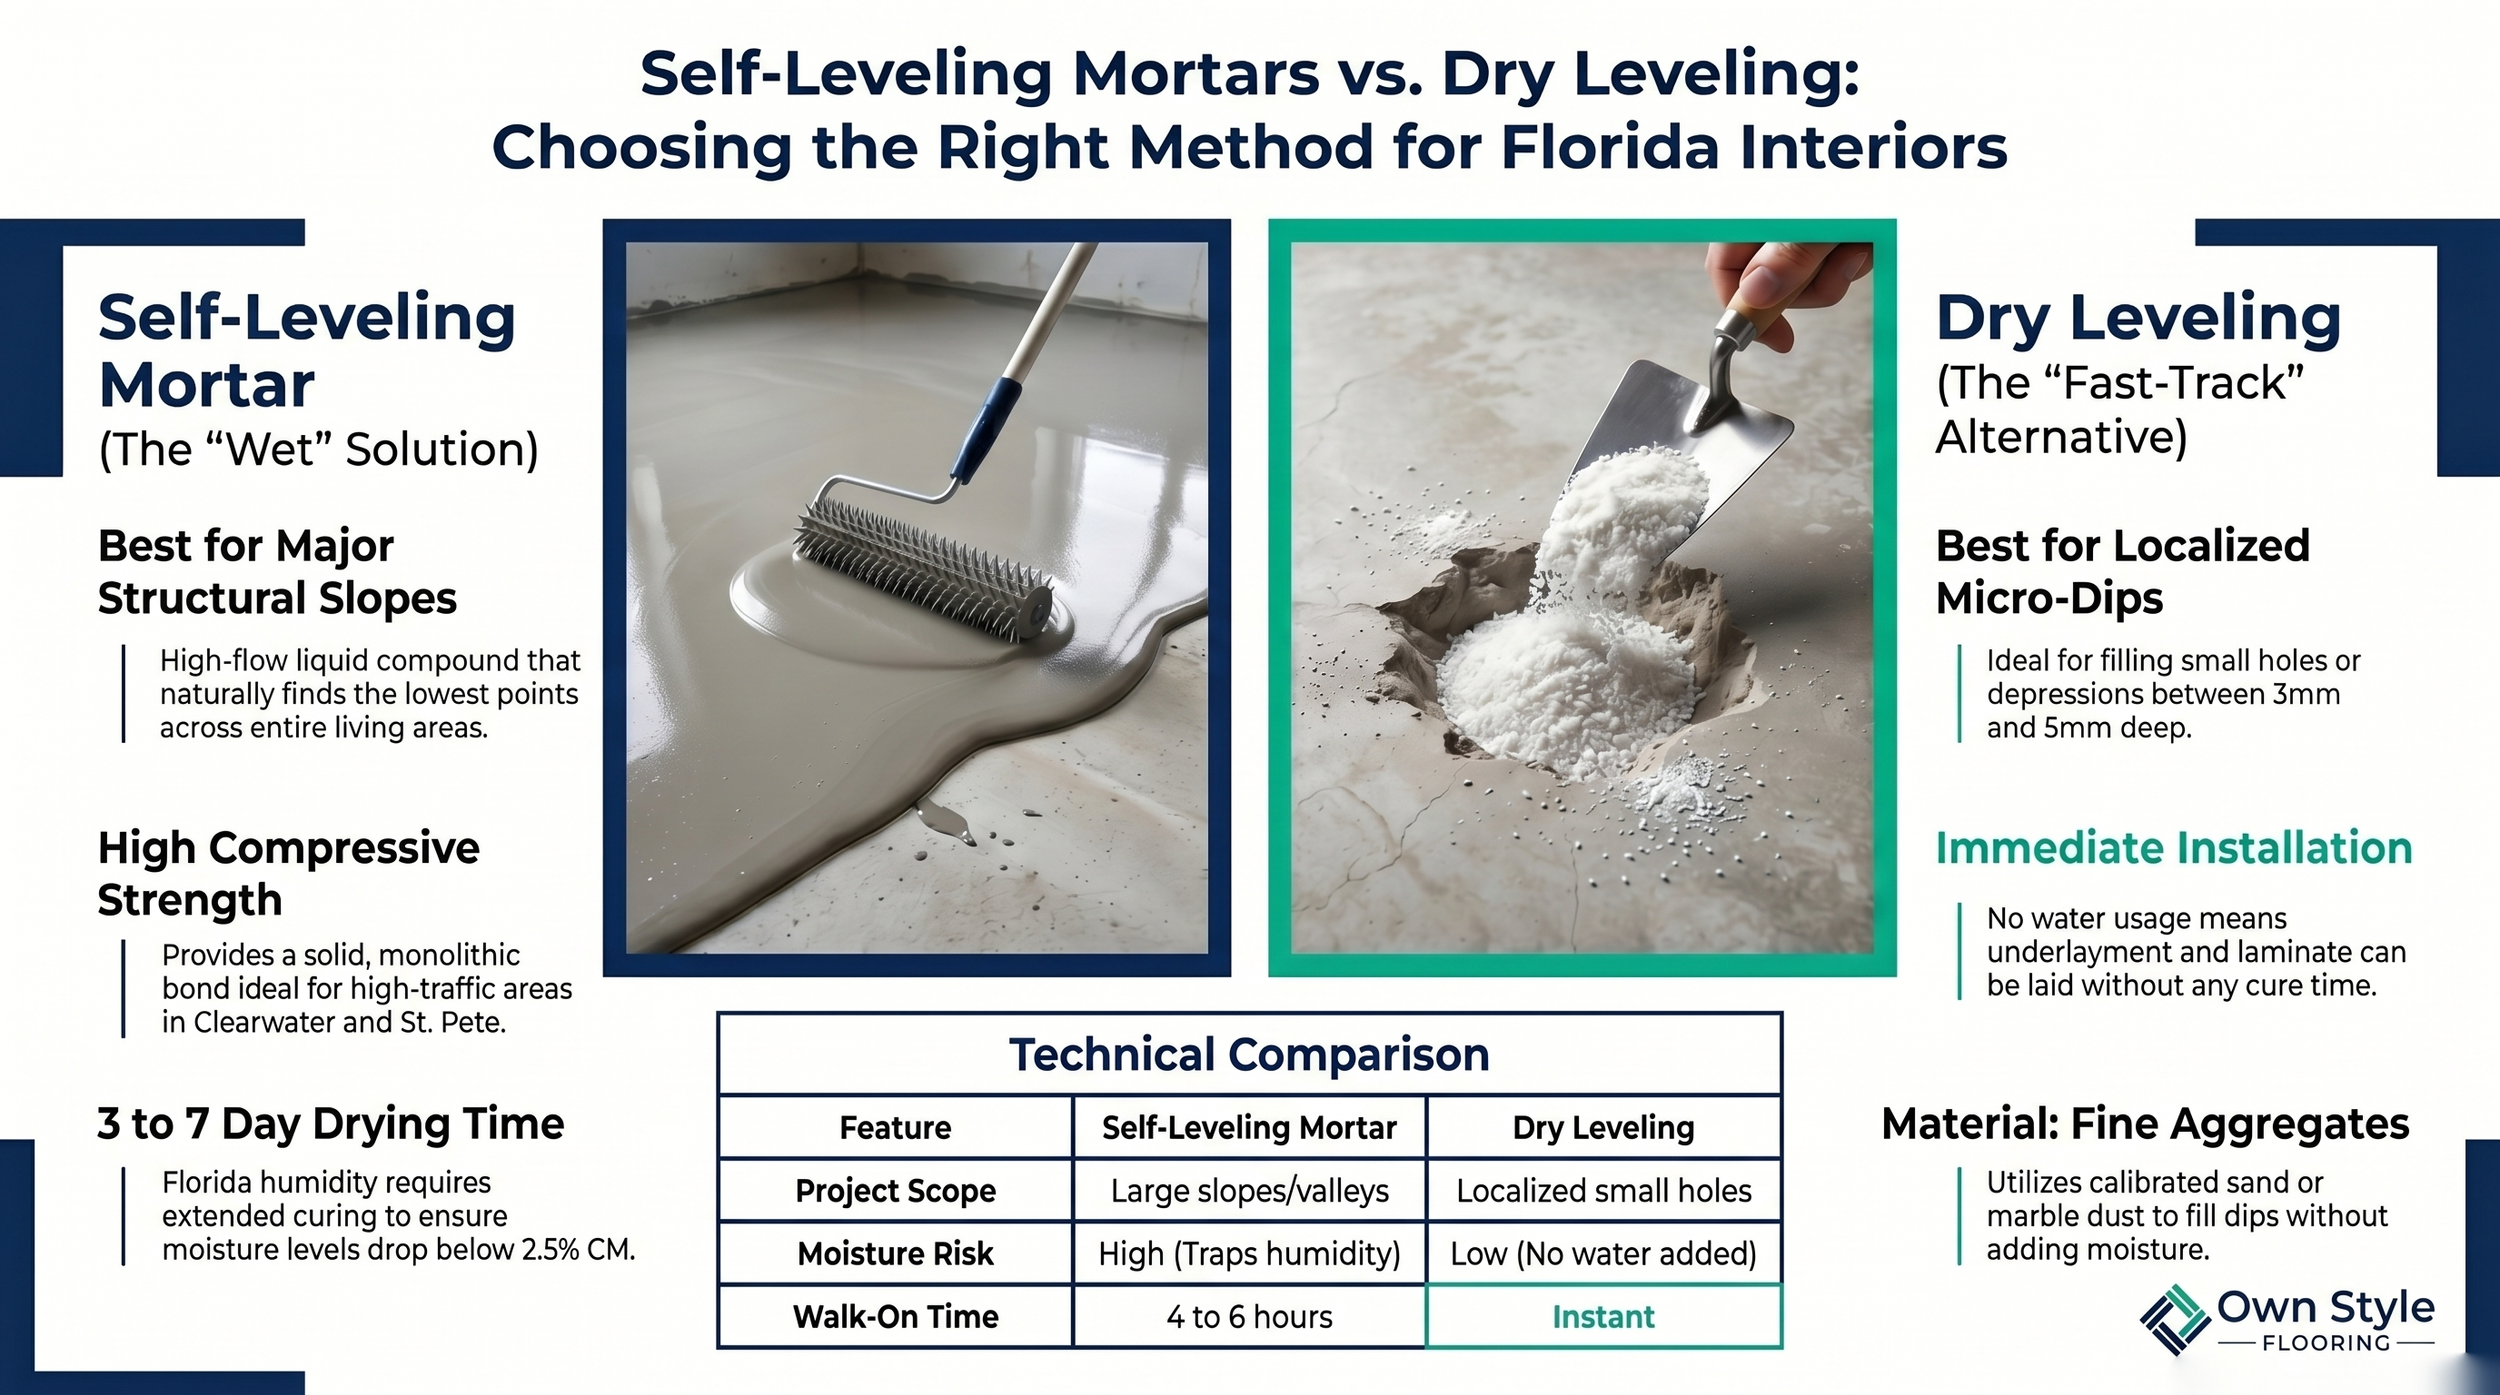
Self-leveling mortar is the correct choice when a Tampa Bay concrete slab has widespread depressions exceeding 5mm or slopes spanning an entire room; dry leveling with calibrated aggregates is appropriate only for localized dips of 3–5mm where zero moisture addition and immediate installation are priorities. In Hillsborough County's humid climate — where indoor relative humidity regularly exceeds 70% during summer months — the critical difference between these methods is drying time: a wet pour traps moisture that must drop below 2.5% CM before any laminate can be laid safely, while a dry fill adds zero water and allows same-day installation. Choosing the wrong method leads to either moisture-trapped HDF cores or shifting aggregates under furniture loads.
1. Self-Leveling Mortar: The Wet Solution for Major Corrections
In many older homes across Largo and Palm Harbor, concrete slabs develop significant valleys or slopes over decades of natural settlement. For these scenarios, we use high-flow self-leveling mortars — a wet method where a liquid polymer-modified compound is poured and naturally seeks the lowest points of the room. It is the most effective correction for deviations that span entire living areas or exceed 5mm in depth. The mortar bonds chemically with the existing concrete, creating a monolithic surface with compressive strength exceeding 3,000 PSI — far superior to any fill material. However, this method demands professional control: incorrect water-to-powder ratios, ambient temperatures below 50°F, or insufficient primer application all create bond failures that crack within weeks of installation.
2. Technical Protocol for Mortar Application
Applying self-leveling mortar is precision engineering, not a simple pour. At Own Style Flooring, we follow a strict four-step protocol on every project. First, priming: we apply a bonding agent to the concrete surface to prevent the porous slab from absorbing water from the mortar too quickly, which causes surface cracking and delamination at the bond line. Second, perimeter sealing: closed-cell foam strips seal every edge of the room, preventing liquid mortar from leaking into wall cavities or through floor vents in your Town 'n' Country home. Third, air removal: we pass spiked rollers across the fresh pour to eliminate trapped air bubbles that create structural weak points and visible pockmarks in the cured surface. Finally, thickness control: most professional-grade mortars have a maximum single-pour depth of 25mm — exceeding this requires multiple pours with complete 24-hour cure cycles between each layer.
3. Dry Leveling: The Fast-Track Alternative
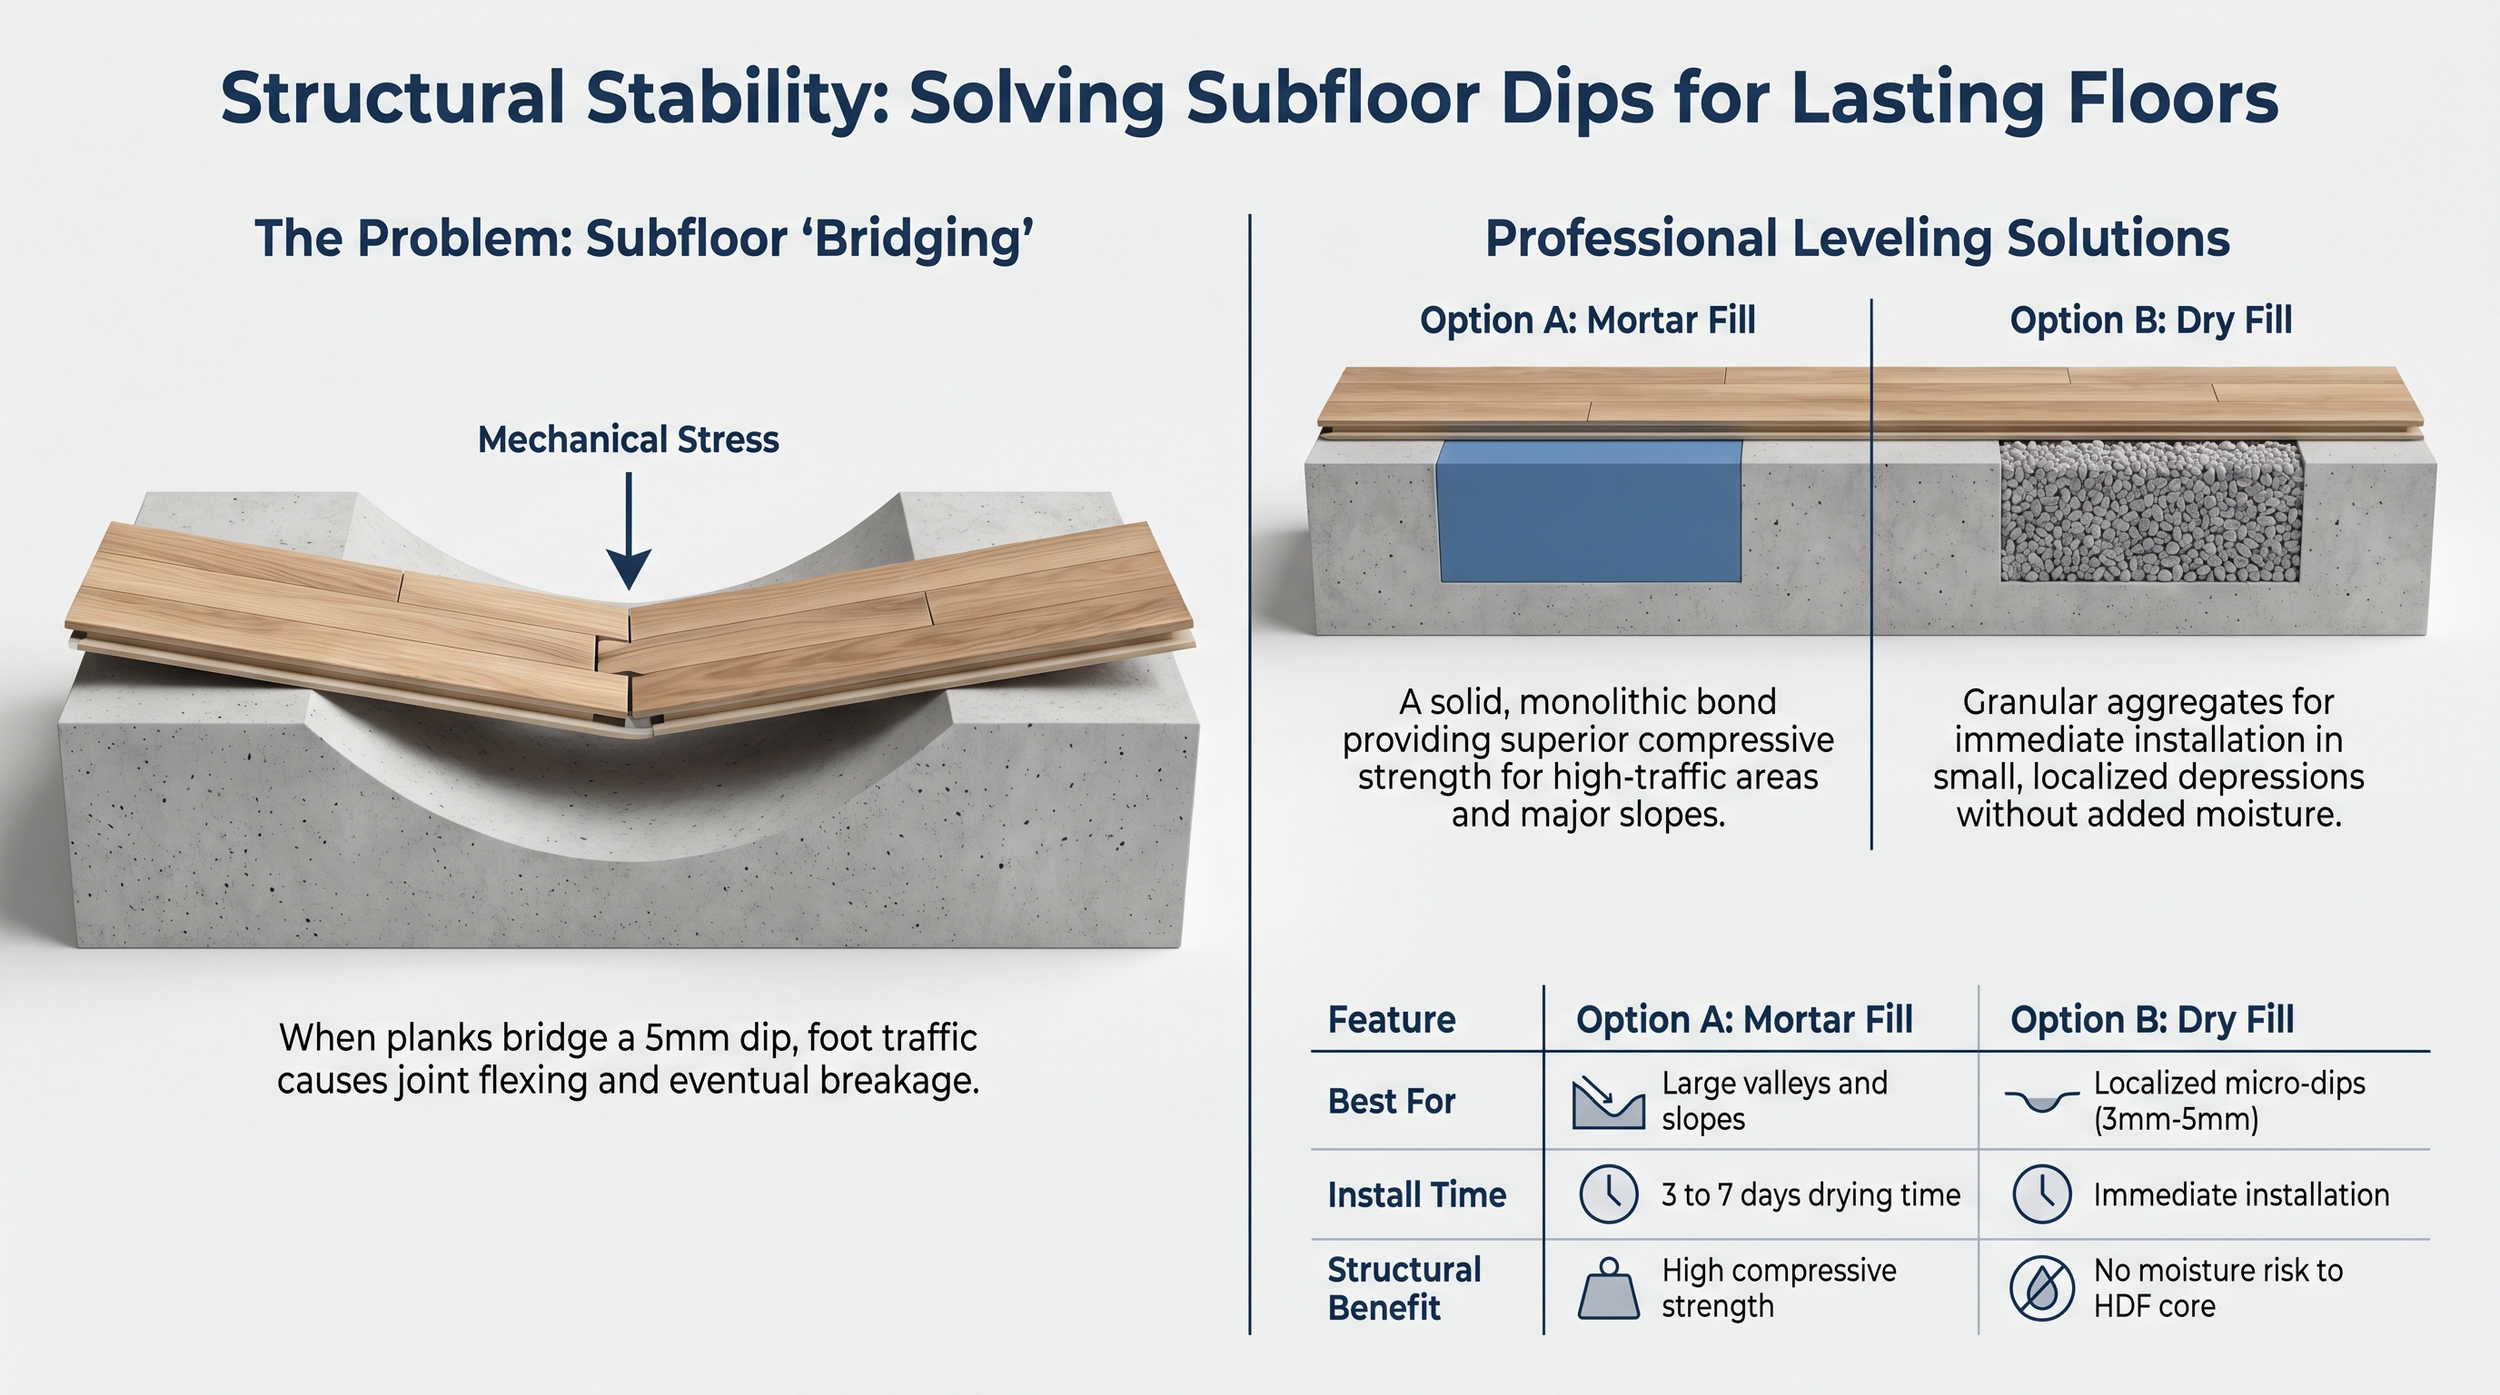
For homeowners in Seffner or Brandon who need a floor installed on a tight schedule, dry leveling with fine aggregates represents an excellent alternative for localized issues. This method uses calibrated sand or marble dust — particles screened to a consistent 0.5–2mm diameter — to fill small depressions without introducing a single drop of moisture into the environment. Because there is no chemical cure time, the underlayment and laminate can be laid immediately after filling and compacting. It is the ideal solution for a slab that measures mostly flat on a 1.5-meter straight-edge but has a few isolated 3mm to 5mm depressions that would otherwise cause click-lock joints to bridge and flex. The aggregate must be compacted firmly with a flat tamper to prevent settling; loose fill beneath a floating floor creates the same bouncing sensation as an unleveled dip. The material cost is also significantly lower: dry aggregate runs approximately $0.50–$1.00 per square foot versus $2.00–$4.00 for professional-grade self-leveling compound, making it an economical choice for rental properties and budget-conscious renovations across the Tampa Bay area.
4. The Drying Time Trap in Florida's Humidity
The single biggest risk with wet leveling in Hillsborough County is Florida's relentless ambient humidity. A standard self-leveling pour may feel firm enough to walk on within 4 to 6 hours, but surface firmness does not equal moisture readiness for flooring installation. If you install laminate over mortar that still contains trapped moisture, the HDF core absorbs that moisture through the underside and swells irreversibly — the exact failure mode we detail in our calcium carbide moisture testing guide. Depending on pour thickness and local conditions, you may need to wait 3 to 7 full days before residual moisture drops below the critical 2.5% CM threshold. During Tampa Bay summers, with indoor relative humidity hovering between 65% and 75% even with air conditioning, this window consistently pushes toward the longer end. We always verify with a professional CM test before proceeding — never by touch or visual inspection alone.
Subfloor Leveling Methods Compared: Self-Leveling Mortar vs. Dry Leveling Aggregates
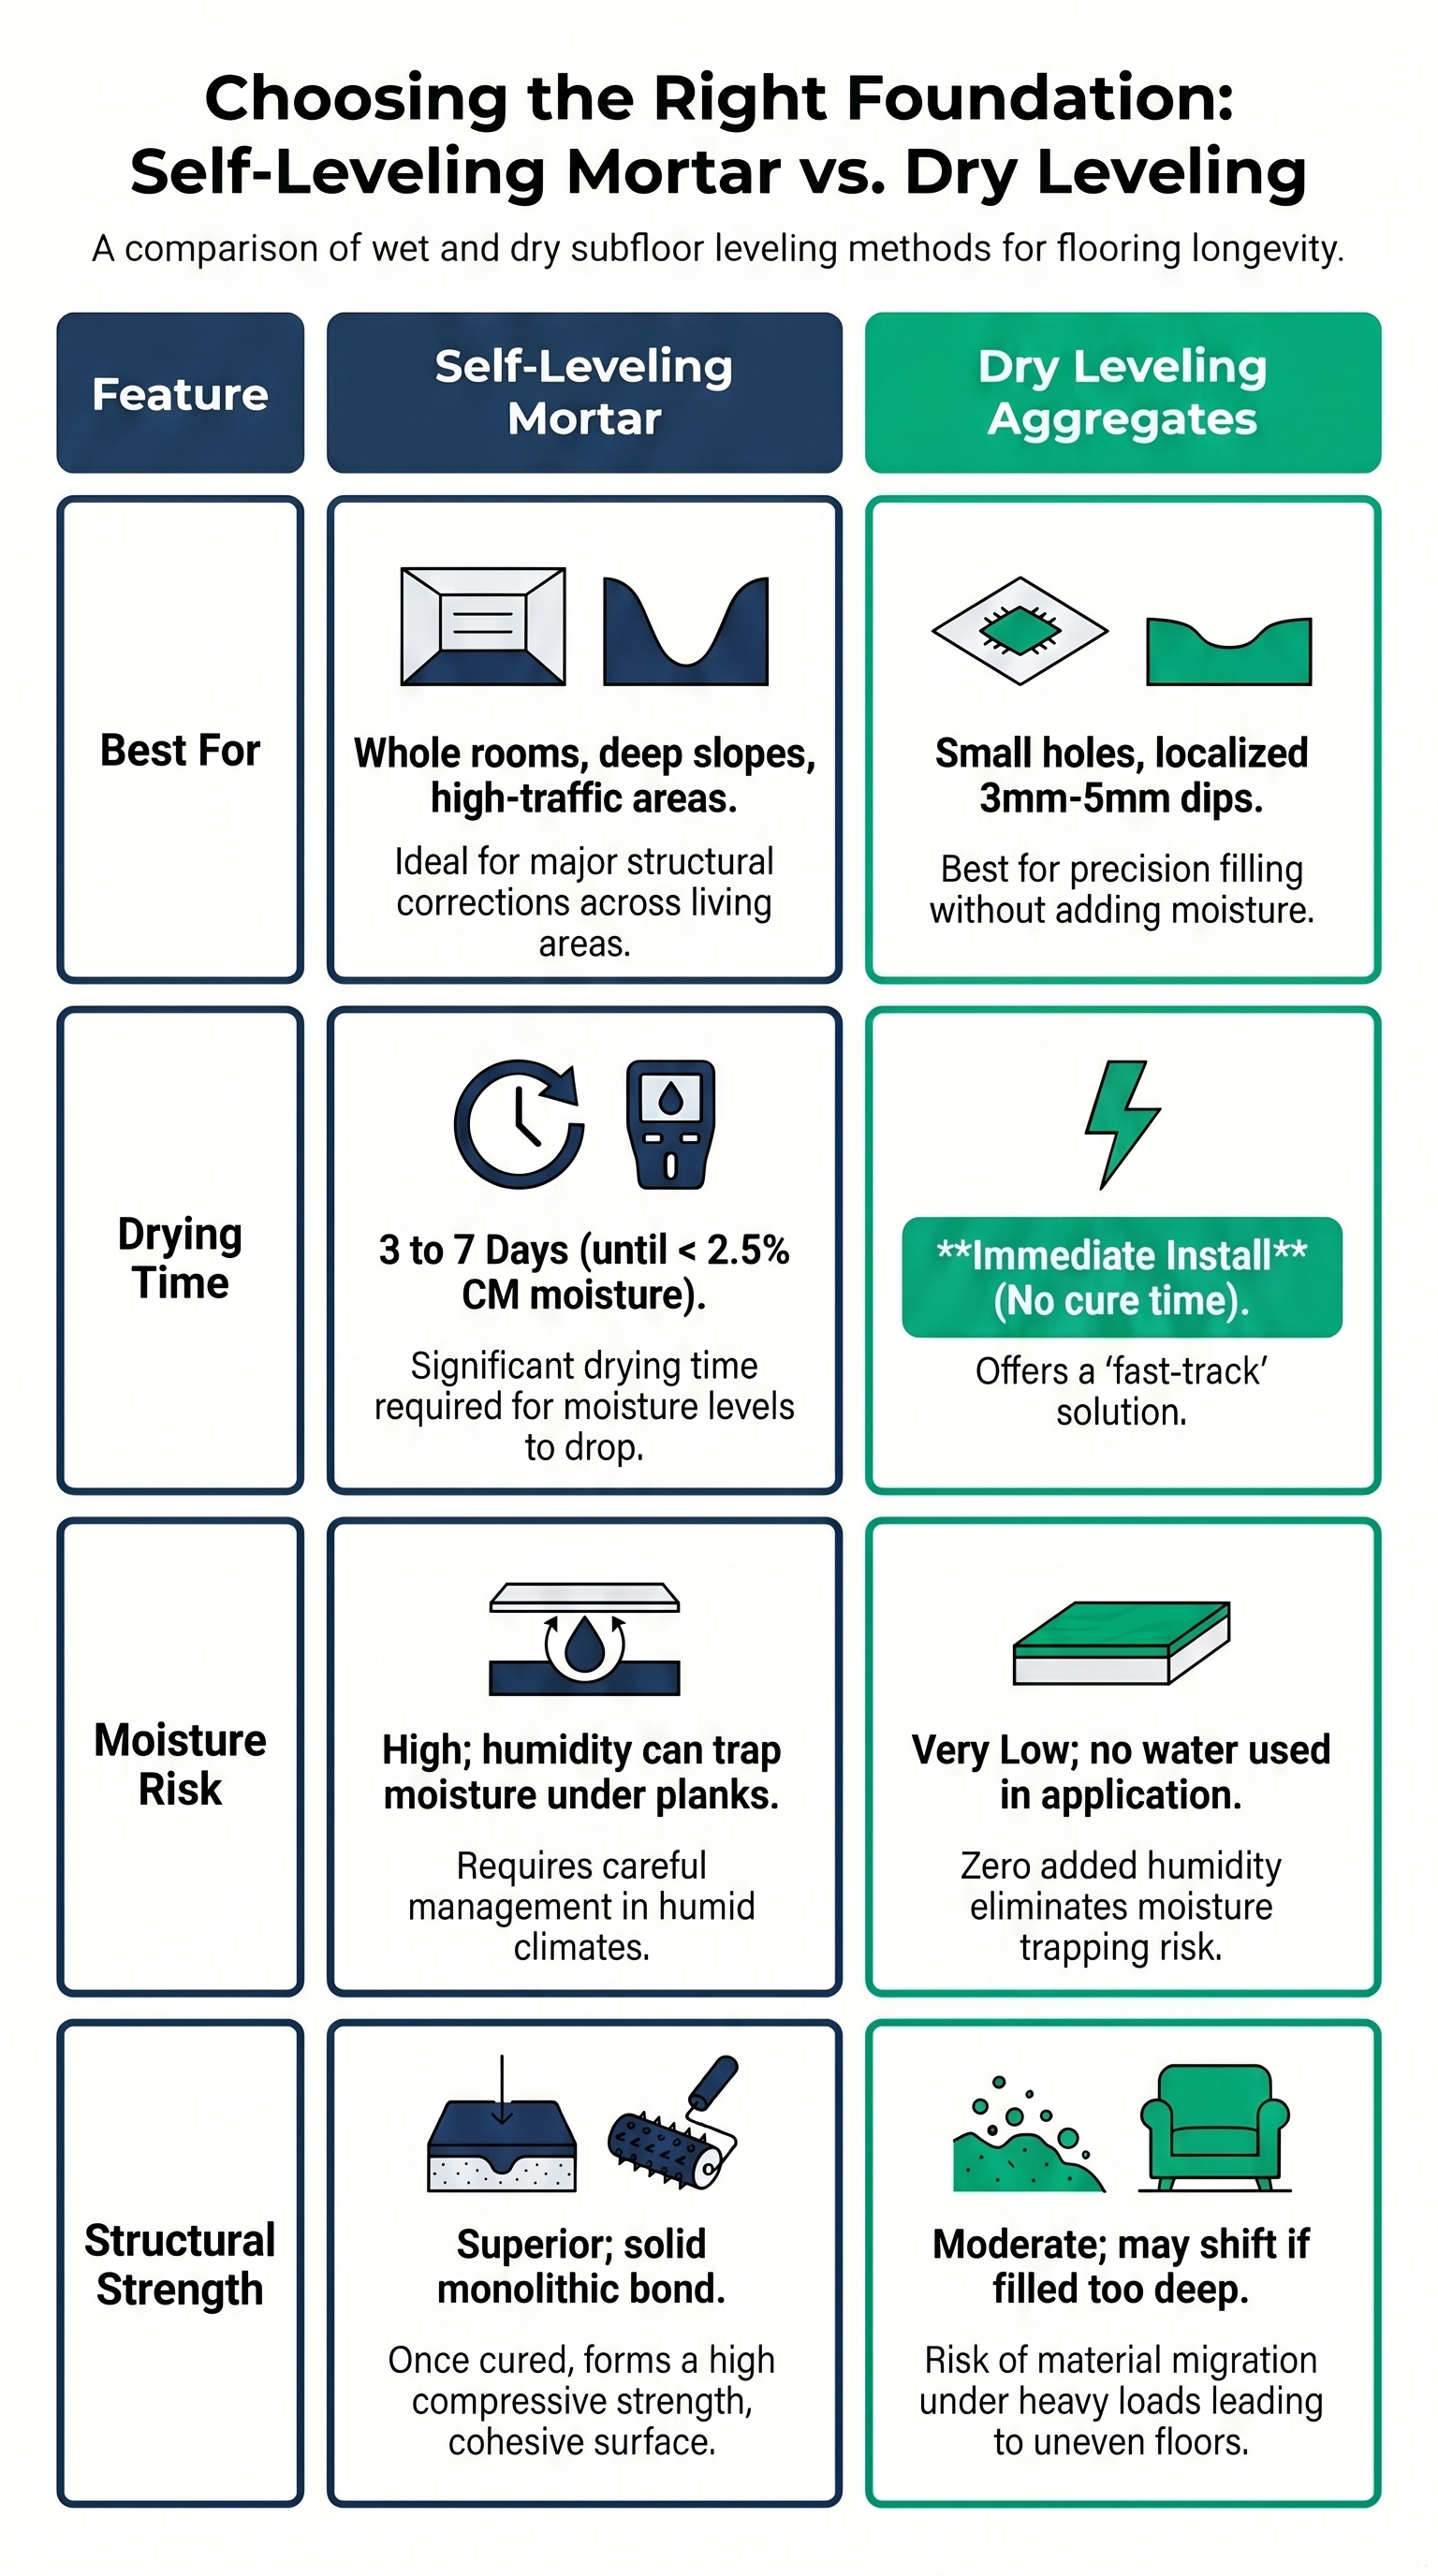
Choosing the right subfloor leveling method is a critical step that directly affects the longevity and performance of any flooring installation. Self-leveling mortar is the go-to solution for whole rooms, deep slopes, and high-traffic areas, delivering superior structural strength through a solid monolithic bond — but it comes with a 3-to-7-day drying period and carries significant moisture risk in humid climates like Florida's. Dry leveling aggregates, on the other hand, are best suited for small, localized imperfections in the 3mm–5mm range, offering an immediate installation advantage with virtually zero moisture risk since no water is involved in the application. However, their structural strength is moderate, and overfilling can lead to material migration under heavy loads over time. Understanding these trade-offs — cure time, moisture sensitivity, and load-bearing capacity — allows flooring professionals to select the method that best matches the specific conditions of each job site.
5. Maximum Depth Limits and Method Matching
A common and costly error is exceeding the manufacturer's maximum recommended depth for either method. If you apply wet mortar too deep — beyond 25mm in a single pour — to compensate for a massive structural slope, the center of the mass may never fully cure, creating a permanent moisture reservoir beneath the finished floor. Similarly, using dry aggregates for anything beyond 8mm depth is structurally dangerous because granular particles shift and migrate under concentrated loads from furniture legs, causing the floor to settle and become uneven again within months. Professional assessment with laser levels and straight-edge measurements ensures the correct material is matched to the specific depth and extent of each depression. In our projects across Clearwater and St. Petersburg, we frequently combine both methods on a single slab: grinding down ridges, pouring mortar in broad valleys, and dry-filling isolated shallow pockets.
6. Structural Performance and Long-Term Stability
The fundamental goal of any leveling method is a subfloor that does not flex under foot traffic or furniture loads. Self-leveling mortar delivers superior compressive strength and forms a rigid, crack-resistant surface — making it the definitive solution for high-traffic corridors and large open-plan living spaces common in Florida ranch-style homes built on slab-on-grade foundations. Dry leveling, while convenient and cost-effective, is structurally appropriate only for contained, shallow corrections in low-traffic zones like closets, spare bedrooms, or areas beneath built-in cabinetry. If a significant portion of your subfloor reads out-of-tolerance across multiple passes of a 1.5-meter straight-edge, the long-term stability of a wet fix justifies the additional drying time and material cost. Consider the math: a floor that settles six months after installation requires complete removal of all laminate planks in the affected area, releveling, new underlayment, and reinstallation — easily $3,000–$5,000 in a typical 400 sqft Riverview living room. Doing it right the first time with proper mortar application costs a fraction of that repair bill.
7. Professional Leveling as Investment Protection
Whether your project requires a wet pour, a dry fill, or a hybrid approach combining both, the precision of execution determines the lifespan of your floor. By hiring Own Style Flooring at $5–$9 per square foot installed, you are paying for the technical judgment to match method to condition — and the professional equipment (laser levels, polymer primers, spiked rollers, HEPA-filtered grinders) to execute it correctly. We do not guess; we measure with straight-edges, test moisture with calibrated instruments, and verify flatness before a single plank is laid. The result is a laminate floor that stays flat, silent, and beautiful across its full 20-year service life — even through Tampa Bay's demanding seasonal humidity cycles.
Frequently Asked Questions (FAQ)
-
In Tampa Bay's humidity, you should wait at least 3 to 7 days. Even if the surface feels firm, a professional CM moisture test must confirm levels below 2.5% CM before installation — otherwise the HDF core absorbs trapped moisture and swells irreversibly.
-
For small, localized dips of 3–5mm, dry aggregates provide adequate support. However, for large-scale corrections or high-traffic areas, mortar is significantly stronger — it forms a monolithic bond exceeding 3,000 PSI that will not shift under furniture loads over time.
-
No. Dry fill beyond 8mm depth is structurally unsafe because granular particles migrate under pressure from heavy furniture, causing the floor to settle and become uneven again within months. Deep depressions require a wet mortar fix with proper cure time.
-
The pour itself is low-odor, but the preparation phase — grinding down high spots to meet the 2mm tolerance — generates significant concrete dust. At Own Style Flooring, we connect industrial grinders to HEPA-filtered vacuums to keep your home in Valrico or Riverview clean throughout the process.
Double-click to edit...
Other interesting topics
Other interesting topics